You keep missing posting deadlines. You scramble for content ideas at the last minute. You forget important dates until it’s too late. Without a plan, creating consistent content feels overwhelming, especially when you’re already juggling everything else in your business.
A content calendar solves this problem. It gives you a clear view of what you’re posting, when you’re posting it, and where it’s going. You’ll spend less time wondering what to create next and more time actually connecting with your audience.
This guide walks you through creating your first content calendar from start to finish. You’ll learn how to pick the right tools for your skill level, map out your content across weeks and months, and build a system that keeps you consistent without burning you out. We’ll cover free templates you can start using today, simple scheduling methods that work, and practical steps that make content planning manageable. By the end, you’ll have everything you need to organize your content like a pro.
Why a content calendar makes everything easier
A content calendar transforms how you approach content creation. Instead of waking up each day wondering what to post, you’ll know exactly what you’re creating and when you’re publishing it. This simple shift removes the constant pressure of coming up with ideas on the fly and gives you control over your entire content strategy.
You save time and reduce decision fatigue
Planning ahead means you can batch similar tasks together. You write all your blog posts in one sitting, schedule social media updates during another block, and create graphics when you’re in creative mode. This approach cuts down the time you spend switching between different types of work. You’ll also avoid the mental drain that comes from making dozens of small decisions every single day about what content to create next.
When you know what’s coming next, you spend less energy deciding and more energy creating.
You maintain consistency without burning out
Your audience expects to hear from you regularly. A calendar helps you space out your content evenly instead of posting three times one week and disappearing the next. You can plan lighter content for busy periods and schedule more substantial pieces when you have extra time. This balance keeps you visible without overwhelming your schedule.
You spot gaps and opportunities early
Looking at a full month or quarter of content reveals patterns you’d miss otherwise. You might notice you’ve covered the same topic three times but ignored another important area. You can also plan around holidays, launches, or events before they sneak up on you. When you create a content calendar, you see the complete picture of your content strategy instead of just the next post in front of you.
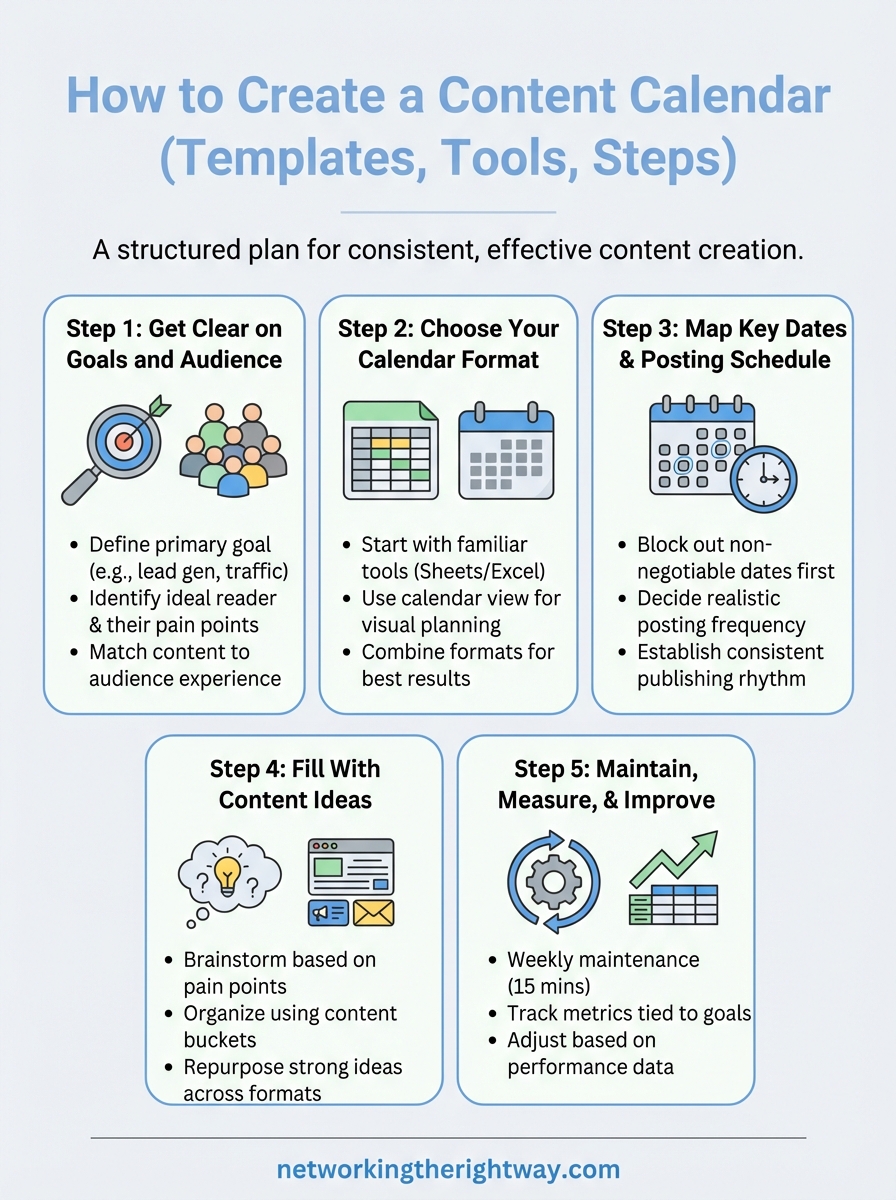
Step 1. Get clear on your goals and audience
Before you create a content calendar, you need to know why you’re creating content and who you’re creating it for. This foundation determines everything else in your calendar. Without clear goals and audience insights, you’ll fill your calendar with content that doesn’t move your business forward or connect with the right people.
Define what success means for your content
Start by writing down one primary goal for your content. Are you trying to build an email list? Drive traffic to a sales page? Position yourself as an expert? Each goal requires different types of content and posting frequencies. If you want newsletter signups, you’ll focus on helpful blog posts with clear opt-in opportunities. If you’re promoting a product launch, you’ll plan a series of posts that build anticipation and demonstrate value.
Your goal also determines how often you need to post. A goal of staying visible to your audience might mean posting three times per week on social media. A goal of ranking in search engines might mean one detailed blog post per week. Pick a realistic frequency based on your available time and stick to it. Consistency matters more than volume when you’re just starting.
Your content calendar should serve your business goals, not just fill empty spaces on a schedule.
Identify who you’re creating content for
Think about the specific person who will benefit most from your content. What problems keep them up at night? What questions do they type into search engines? What stage of their journey are they in? Someone just discovering their problem needs different content than someone ready to buy a solution. Write down three to five pain points your ideal reader faces. These pain points become the topics you’ll plan in your calendar.
Match your content to their experience level too. If your audience includes beginners over 50 who’ve tried and failed before, you’ll avoid technical jargon and break complex topics into simple steps. You’ll also address their fears and past frustrations directly. Your calendar should include content that acknowledges where they are right now and guides them to where they want to be.
Ask yourself these specific questions:
- What does my ideal reader struggle with most?
- What incorrect beliefs do they hold that I need to correct?
- What quick wins can I help them achieve?
- What keeps them from taking action?
Write the answers somewhere you can reference when filling your calendar. Every piece of content you plan should connect back to these insights about your audience and your goals.
Step 2. Choose your calendar format and tools
The right calendar format depends on what you already use every day and how you prefer to see information. You don’t need fancy software to create an effective content calendar. Many successful content creators use simple spreadsheets they update weekly. The best tool is the one you’ll actually open and use consistently, not the one with the most features.
Start with what you already know
If you use Google Sheets or Excel regularly, start there. These tools give you complete control over your layout without forcing you to learn new software. You can color-code different content types, add notes in cells, and share the document with team members if you need feedback. A spreadsheet lets you sort, filter, and search your content easily. You’ll find it simple to duplicate successful content patterns and adjust your schedule as you learn what works.
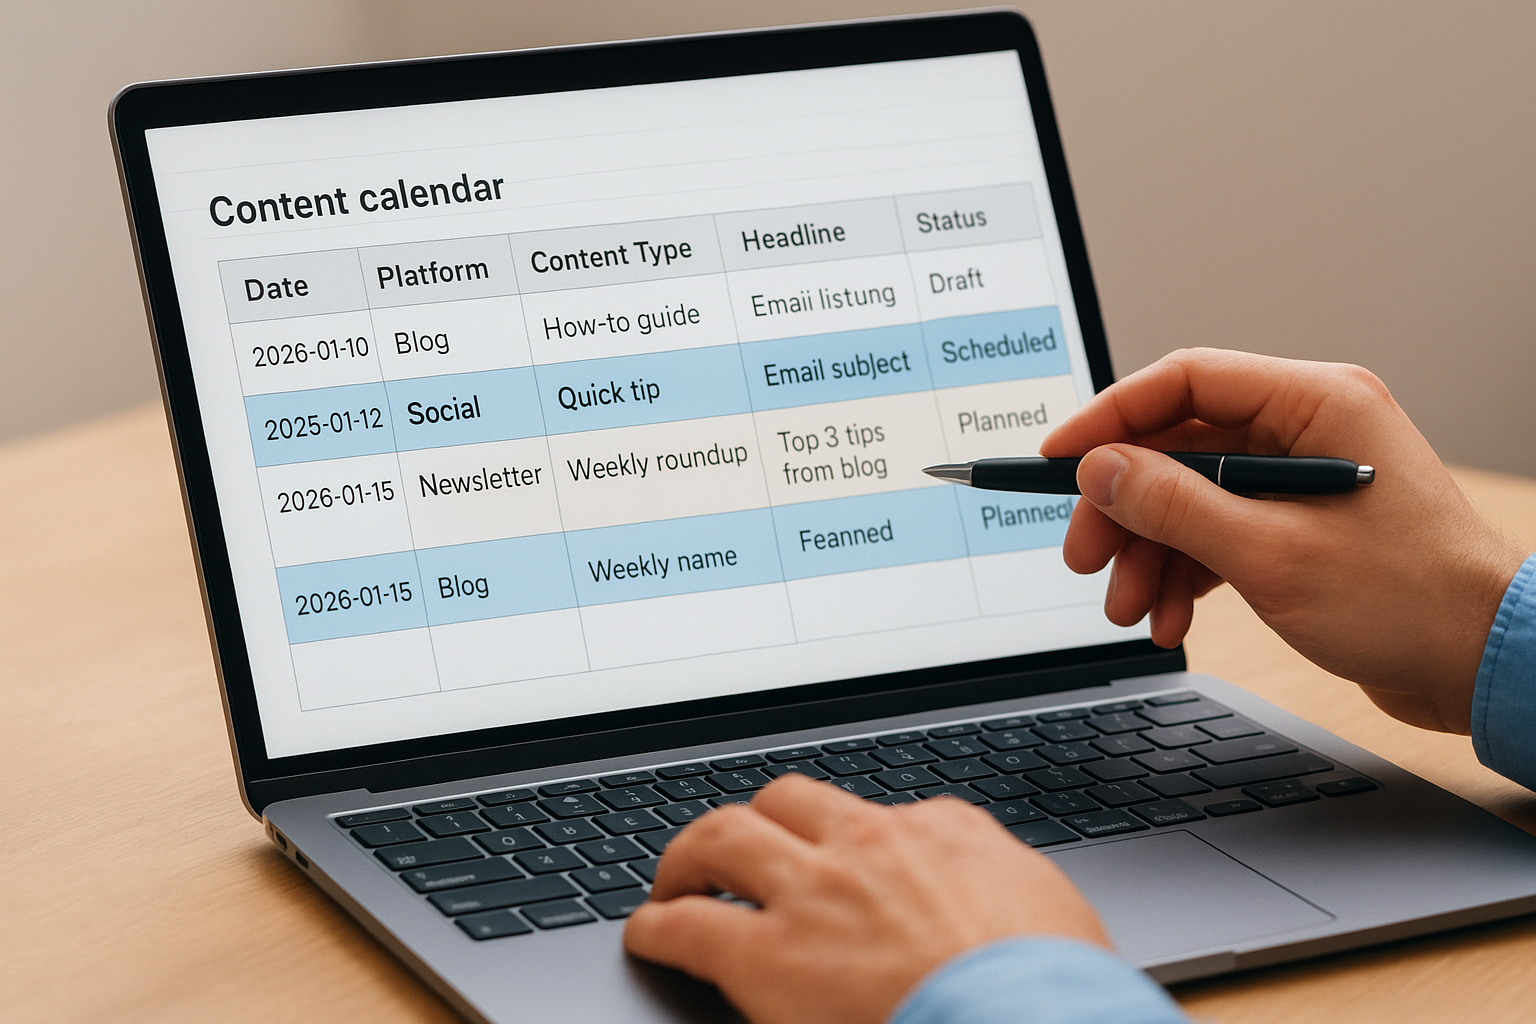
Here’s a basic template structure you can build in any spreadsheet:
| Date | Platform | Content Type | Topic/Headline | Status | Notes |
|---|---|---|---|---|---|
| 2026-01-10 | Blog | How-to guide | Email list building | Draft | Add template screenshot |
| 2026-01-12 | Social | Quick tip | Email subject lines | Scheduled | Links to blog post |
| 2026-01-15 | Newsletter | Weekly roundup | Top 3 tips from blog | Planned | Include CTA for course |
Add columns that match your workflow
Customize your spreadsheet by including fields that answer your specific questions. Add a column for the primary goal of each piece (traffic, engagement, conversions). Include one for relevant keywords if you focus on search rankings. Create a status column with options like “Idea,” “Draft,” “Ready,” and “Published” to track progress at a glance.
You might also add columns for the writer’s name, target word count, or links to published content. Keep it simple at first. You can always add more columns later when you identify gaps in your planning process.
The calendar format that helps you stay consistent is better than the perfect system you abandon after two weeks.
Try calendar view tools if you think visually
Google Calendar or Outlook Calendar work well if you prefer seeing your content laid out by date. You create separate calendars for different content types (blog posts in blue, social media in green, newsletters in orange). This visual approach makes it easy to spot posting gaps or weeks when you’ve scheduled too much at once. You add the content topic in the event title and include relevant links or notes in the description field.
Many people learning how to create a content calendar find that combining both formats gives them the best results. They use a spreadsheet for detailed planning and tracking, then add key dates to a visual calendar for quick reference. This dual approach helps you see both the details and the big picture without switching between complex tools.
Pick one format today and set it up with at least two weeks of placeholder content. You’ll refine your system as you use it, but you need something concrete to start working with right now.
Step 3. Map key dates and posting schedule
Once you have your format ready, you need to populate your calendar with anchor dates and establish a realistic publishing rhythm. This step prevents you from missing important opportunities and helps you distribute your content evenly across weeks and months. You’ll build a framework that keeps your content aligned with your business activities and audience needs.
Block out non-negotiable dates first
Start by marking every business-critical date on your calendar for the next three months. Include product launches, special promotions, seasonal events, and industry deadlines that matter to your audience. If you’re planning a course launch in March, mark the launch date and work backwards to schedule announcement posts, testimonial content, and value-driven pieces that build interest. Holiday periods deserve attention too, even if you don’t create holiday-specific content. You’ll want to schedule lighter workloads during weeks when you know you’ll have less time available.
Add these key dates to your calendar right now:
- Product or service launches
- Seasonal promotions or sales periods
- Industry events or conferences
- Holiday closures or vacation time
- Content upgrades or lead magnet releases
Your content calendar should support your business timeline, not work against it.
Decide your realistic posting frequency
Choose a posting schedule you can maintain consistently rather than an ambitious plan you’ll abandon in three weeks. Look at your current workload and available time blocks. One detailed blog post per week beats three rushed posts that don’t serve your audience. Match your frequency to each platform based on your goals. You might publish one long-form blog post weekly, send one newsletter every two weeks, and share three social media updates each week.
Write down your commitment for each content type:
- Blog posts: Once per week (Tuesdays)
- Newsletter: Every other Friday
- Social media: Monday, Wednesday, Friday
Build your posting rhythm
Plot out specific publish dates across your calendar based on the frequency you just chose. Space them evenly to maintain consistent visibility with your audience. If you post blog content every Tuesday, mark every Tuesday for the next month. Add your newsletter dates on alternating Fridays. This structure gives you clear deadlines to work toward instead of vague intentions to post “sometime this week.”

Your calendar should now show empty slots with dates and content types filled in. You’ll populate these slots with actual topics in the next step, but having the structure in place first keeps you from overcommitting or leaving awkward gaps between posts.
Step 4. Fill the calendar with content ideas
Now that you have dates and a posting rhythm established, you need to populate those empty slots with actual content topics. This step turns your calendar from a skeleton structure into a working plan. You’ll generate more ideas than you need, organize them strategically, and learn how to stretch good ideas across multiple pieces without repeating yourself.
Start with targeted brainstorming sessions
Set aside 30 minutes with a timer and write down every content idea that addresses your audience’s pain points. Don’t edit yourself during this session. Write questions people ask you repeatedly, topics that confuse beginners, mistakes you see people make, and problems your product or service solves. You’re aiming for quantity over quality at this stage because you’ll refine ideas later.
Use these prompts to generate ideas faster:
- What questions do people ask me most often?
- What topics confuse my audience?
- What did I wish someone had told me when I started?
- What myths or mistakes do I need to correct?
- What quick wins can I help people achieve?
Sort your raw ideas into content types that match your calendar structure. A complex topic becomes a detailed blog post. A quick answer turns into a social media tip. A common question becomes a newsletter section. You’ll notice some ideas naturally fit certain formats better than others.
The best content ideas come from real conversations with your audience, not from guessing what they want to know.
Organize ideas using a simple framework
Create a content bucket system that ensures variety across your calendar. Assign each idea to one of three to five categories that align with your business goals. You might use categories like “Getting Started,” “Common Mistakes,” “Tools and Resources,” “Success Stories,” and “Next Steps.” This framework prevents you from posting the same type of content week after week and helps you balance educational content with promotional material.
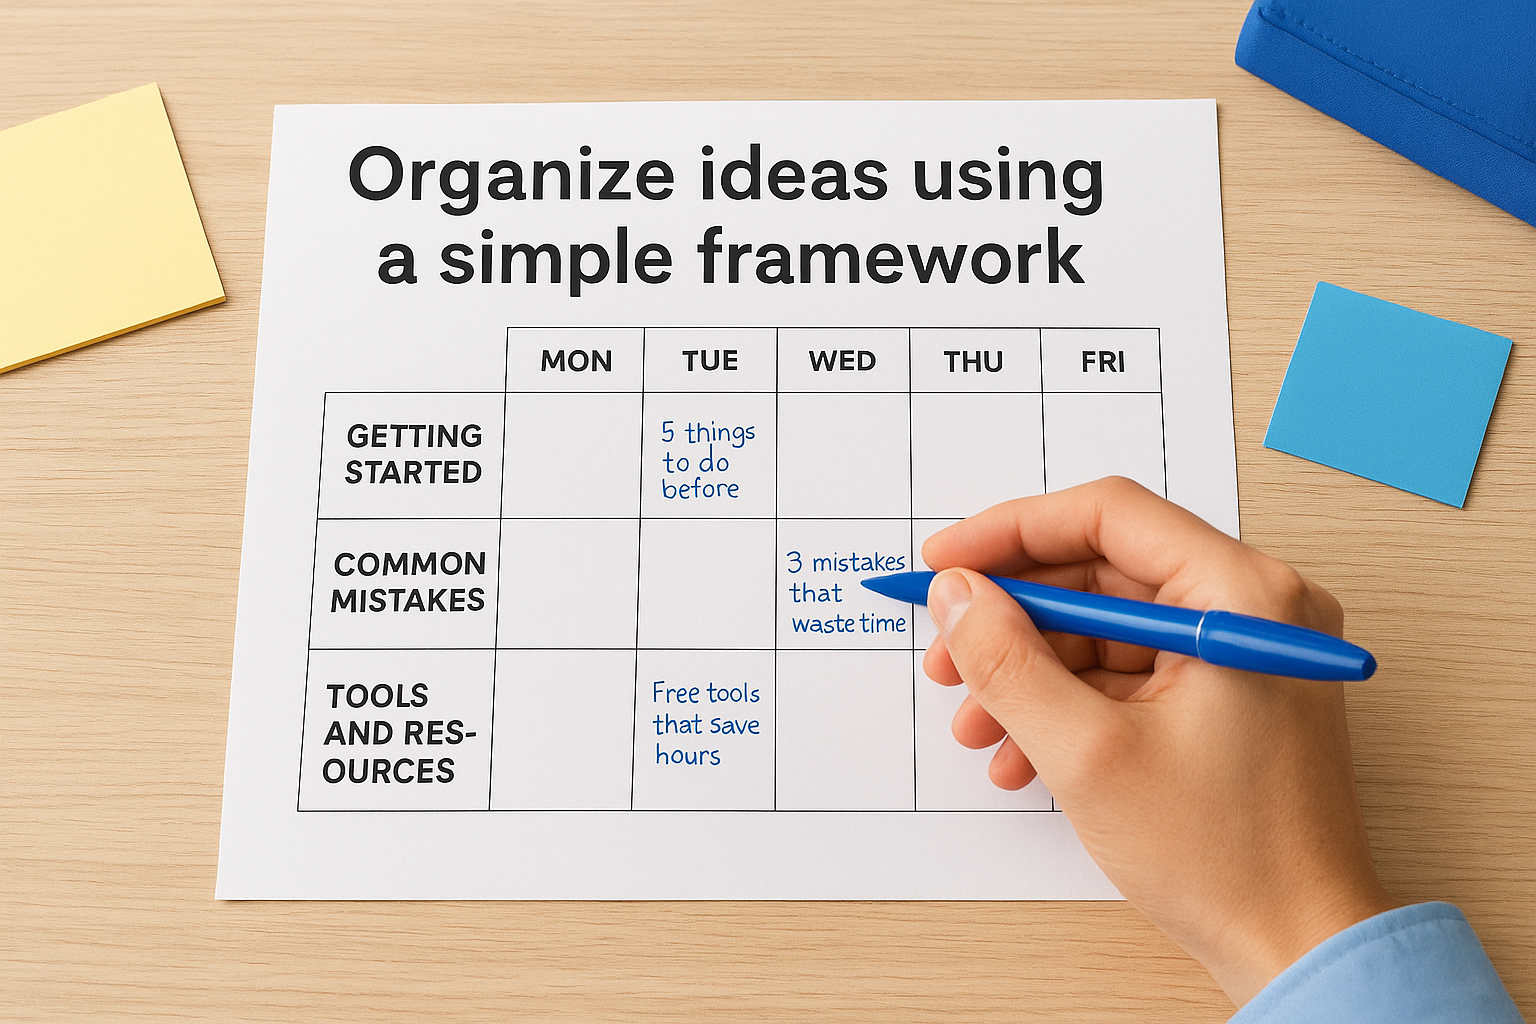
Here’s how to organize your brainstormed ideas:
| Content Category | Purpose | Example Topics |
|---|---|---|
| Getting Started | Help beginners take first steps | “5 things to do before you start,” “What you need to know first” |
| Common Mistakes | Address frustrations and failures | “Why your approach isn’t working,” “3 mistakes that waste time” |
| Tools and Resources | Share practical solutions | “Free tools that save hours,” “Templates you can use today” |
| Next Steps | Guide readers toward your offer | “What to do after you master the basics,” “Taking your results further” |
Repurpose strong ideas across multiple formats
You don’t need a completely new idea for every calendar slot when you learn how to create a content calendar that works efficiently. Take one substantial topic and break it into smaller pieces for different platforms. A comprehensive blog post about email list building becomes three social media posts highlighting individual tips, a newsletter section with a quick win, and a follow-up blog post answering related questions.
Plan content clusters around your strongest ideas. If you write a guide about setting up a newsletter, follow it with posts about subject lines, writing schedules, and measuring results. Each piece stands alone but connects back to the central topic, giving you weeks of related content from one core idea. Add these related topics to your calendar immediately after the main piece so you maintain momentum while the topic stays fresh in your mind.
Drop your organized ideas into the calendar slots you created in Step 3. Match heavier topics to weeks when you have more time and lighter content to busier periods. Leave a few slots open for timely topics or opportunities that emerge later.
Step 5. Maintain, measure, and improve your calendar
Your content calendar isn’t a document you create once and forget about. It needs regular attention and ongoing adjustments based on what actually happens. You’ll discover which content performs well, which posting times work best, and which topics your audience ignores. This step transforms a basic planning tool into a system that gets better every month.
Set up weekly maintenance habits
Reserve 15 minutes every Friday to review your calendar and prepare for the next week. Check that scheduled content is actually ready to publish and move any unfinished pieces to realistic new dates. Fill any empty slots that appeared when plans changed. You’ll also want to add new ideas that emerged during the week before you forget them. These quick maintenance sessions prevent your calendar from becoming outdated or overwhelming.
Your weekly review should include these specific checks:
- Confirm next week’s content is complete and scheduled
- Update status for any in-progress pieces
- Add three new content ideas from the past week
- Note any topics that generated questions or engagement
- Adjust deadlines that you know you’ll miss
Track what actually matters
Pick three specific metrics that connect directly to the goals you set in Step 1. Someone building an email list tracks signups per post, click-through rates, and time spent on page. Someone driving sales tracks product page visits, purchase conversions, and average order value. Write these metrics in a simple spreadsheet alongside each published piece so you build a record of what works. You don’t need expensive analytics tools when you’re learning how to create a content calendar that delivers results.
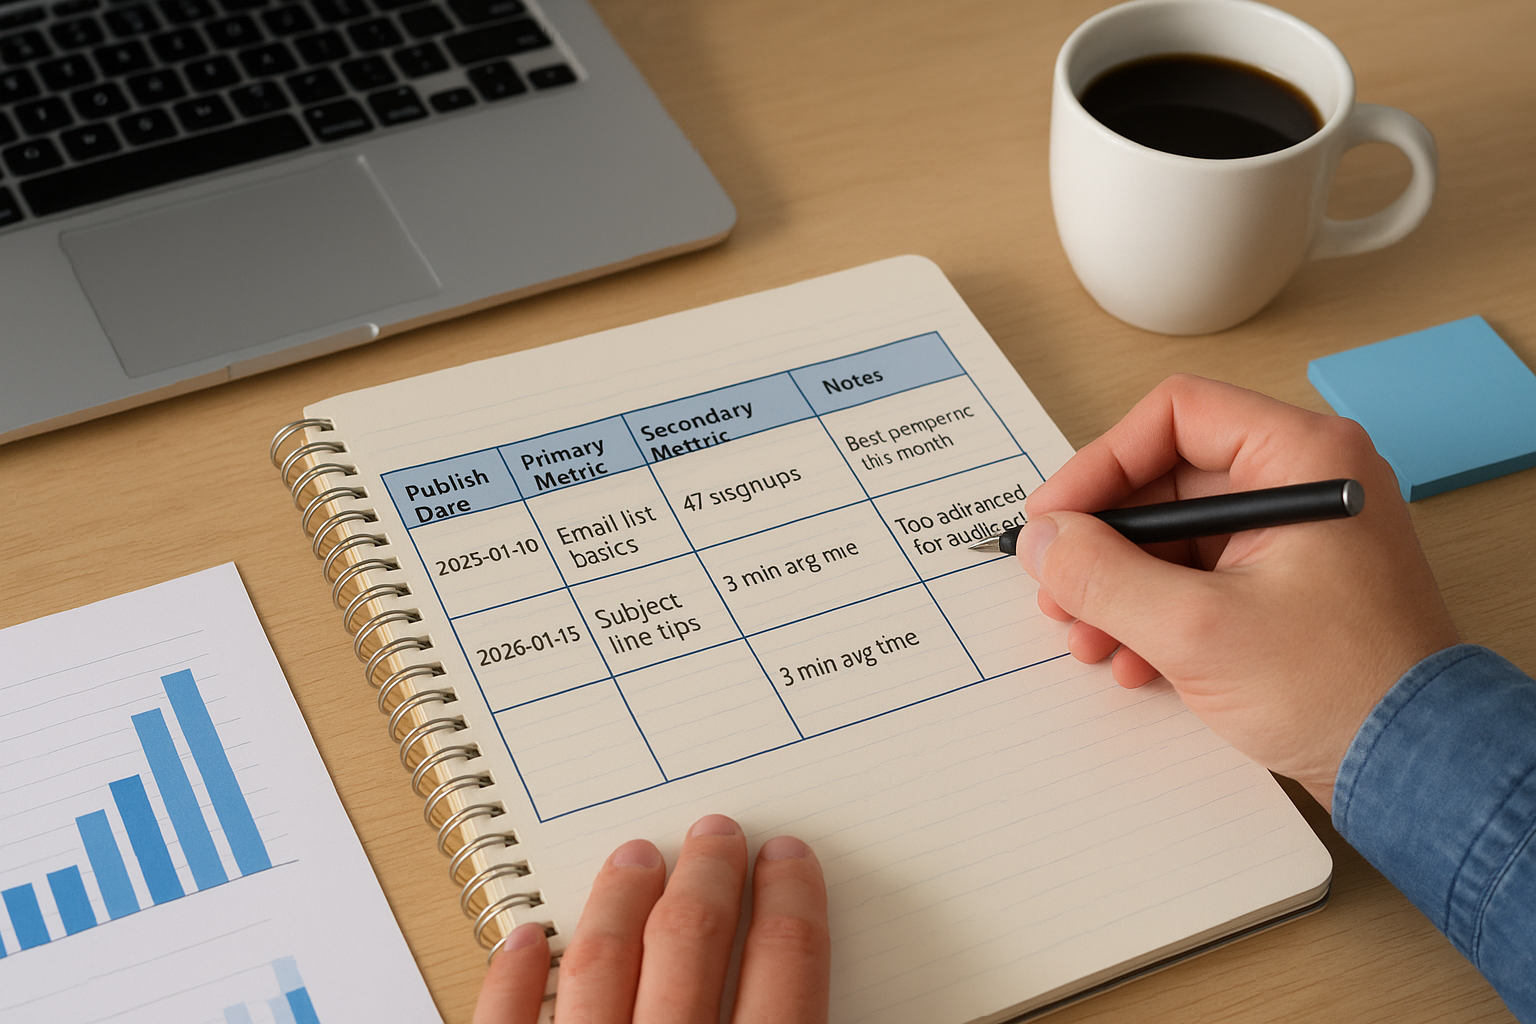
The numbers that matter most are the ones tied directly to your business goals, not vanity metrics like total page views.
Create a simple tracking table for each published piece:
| Publish Date | Topic | Primary Metric | Secondary Metric | Notes |
|---|---|---|---|---|
| 2026-01-10 | Email list basics | 47 signups | 8 min avg time | Best performer this month |
| 2026-01-15 | Subject line tips | 12 signups | 3 min avg time | Too advanced for audience |
Adjust based on real results
Look at your performance data every month and make specific changes to your calendar. Double down on content types and topics that performed well. Stop creating formats that consistently underperform. If Tuesday posts get twice the engagement of Friday posts, shift your schedule. When you notice a topic generated questions in comments, add follow-up content to address those questions. Your calendar should reflect what you learn rather than following a rigid plan that ignores reality.
Make these monthly adjustments to your calendar:
- Schedule more content similar to your top three performers
- Remove or reduce formats that consistently miss your goals
- Shift posting times based on engagement patterns
- Add follow-up topics based on audience questions
- Plan content around successful themes
Your calendar becomes more effective each month because you’re building on evidence instead of guessing what might work.
Ready to start
You now know how to create a content calendar that actually works for your business. You’ve learned which tools fit your skill level, how to structure your posting schedule, and what information to track as you publish content. The hardest part is simply starting, but you’ve already eliminated the guesswork by following these concrete steps.
Pick one format today and block out your next two weeks of content. Fill those slots with topics from your brainstorming session. Schedule time this Friday for your first weekly review session. Your calendar will improve as you use it, but only if you begin working with it now instead of waiting for the perfect moment.
Building a consistent content strategy takes time, and you don’t have to figure everything out alone. If you want a simple way to build a business online with guidance at every step, that support is available when you’re ready to move forward.